
Android Native SDK
validic_android_native_1.19.2
NEW SDK for Inform Clients!We are pleased to announce a new Validic Mobile SDK (version 2.x), which will be affectionately known as the Inform Mobile SDK or the Inform SDK since it is available for Inform clients only.
The Inform SDK is now available in a new mobile portal experience called Artifactory.
If you’re interested in learning more about this new SDK please review the details in our Release Notes and then reach out to our Validic Support team to get access.
Requirements
To get started, download the Android framework from the Validic Mobile portal.
The Validic Mobile library supports Android 9 - 16 (API levels 28 - 36) and requires Android Studio to compile.
In order to use the Validic Mobile Library, you will need a valid organization id and valid user credentials.
If you do not already have an organization id, you will need to first apply for one.
After your organization is set up, you will need a Validic user id and access token.
Validic user can be provisioned using the Validic API, documentation is available for both Legacy API (V1) and Inform API (V2) APIs. The credentials needed are a Validic user ID, an organization ID and a user access token. The user access token value you provide to the SDK is the "user access token" value if you use the Legacy (V1) API. The user access token value you provide to the SDK is the "mobile token" value if you use the Inform (V2) API.
Valid user session requiredA valid session is required in order to use any of the modules in the Validic SDK.
A Validic user must first be provisioned using the Validic API. Then you can start a session in the SDK using their Inform user credentials.
All mobile operations will fail if a valid user session has not been started first.
System Requirements
A minimum sdk of 28 is supported (you may choose a higher value):
android {
    defaultConfig {
        minSdkVersion 28
    }
}
Installation
The library is divided into separate modules. The Shared module is required. Other modules should be added to your project based on the functionality you wish to support in your app.
Maven
The Distribution zip contains a local Maven repository, validic-repository that can be used to add the library and its dependencies to your project's classpath.
In your app/build.gradle file add the following
repositories {
    mavenCentral()
    google()
    maven {
        // Android Maven Distribution folder from zip. Change to point to folder location
        url "../../validic-repository"
    }
}

dependencies{
...
  implementation 'com.validic.mobile:validicmobile-shared:+'
  implementation 'com.validic.mobile:validicmobile-ble:+'
  implementation 'com.validic.mobile:validicmobile-ocr:+'
  implementation 'com.validic.mobile:validicmobile-shealth:+'
//local shealth dependency downloaded from Samsung Health
  implementation files('libs/samsung-health-data-1.5.0.aar)
  implementation 'com.validic.mobile:aggregator_fit:+'
// required for Google Fit
  implementation 'com.google.android.gms:play-services-fitness:21+'
  implementation 'com.google.android.gms:play-services-auth:20+'


}
Manual
Copy the aars
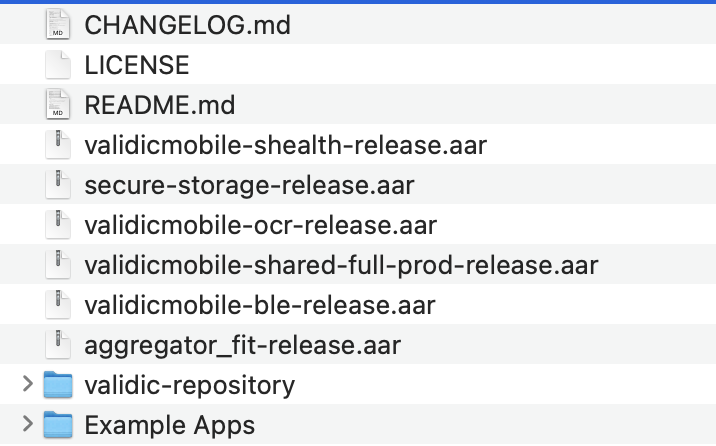
and place it in your project’s app/libs folder. If your project does not currently contain a libs folder, simply create the folder.
Next open your app’s build.gradle file and add the following lines to it:
dependencies {
        ...
        //Required for all projects
        implementation 'files('libs/validicmobile-shared-fullProd-release.aar')
        implementation 'com.google.code.gson:gson:2.8.5'
				implementation 'com.squareup.retrofit2:retrofit:2.10.0'
		    implementation 'com.squareup.retrofit2:converter-gson:2.10.0'
        implementation 'androidx.work:work-runtime:2.8.1'

        // For bluetooth functionality
        implementation files('libs/validicmobile-ble-release.aar')
        implementation 'com.polidea.rxandroidble2:rxandroidble:1.17.1'
        implementation "org.jetbrains.kotlinx:kotlinx-coroutines-android:1.6.4"
        implementation "org.jetbrains.kotlinx:kotlinx-coroutines-rx2:1.6.4"

        //for VitalSnap functionality
        implementation files('libs/validicmobile-ocr-release.aar')

        //for Samsung Health functionality
        implementation files('libs/validicmobile-shealth-release.aar')
        implementation files('libs/samsung-health-data-1.5.0.aar')
        implementation "org.jetbrains.kotlinx:kotlinx-coroutines-android:1.6.4"
        implementation 'androidx.work:work-runtime-ktx:2.10.1'

        //for Google Fit functionality
        implementation files('libs/aggregator_fit-release.aar')
        implementation 'com.google.android.gms:play-services-fitness:21+'
        implementation 'com.google.android.gms:play-services-auth:21+'
        ...

    }
Logging
Logging can be enabled using the static methods in the ValidicLog class.
ValidicLog.globalLoggingEnabled(true);By default, nothing is logged. To start logging update the LogLevel to the appropriate level.
ValidicLog.setLogLevel(ValidicLog.DEBUG);or set your own logging instance
ValidicLog.setLogger(new Logger(){
       @Override
       void log(int level, String tag, String msg){
             Timber.log(level, msg);
        }
}
Session
Session is a singleton object and must be accessed by its getInstance() method. The Session instance stores a Validic User and all pending Record uploads. A valid session is required in order to use any of the modules in the Validic SDK.
Valid user session requiredA valid session is required in order to use any of the modules in the Validic SDK.
A Validic user must first be provisioned using the Validic API. Then you can start a session in the SDK using their Inform user credentials.
All mobile operations will fail if a valid user session has not been started first.
A Validic user can be provisioned using the Validic API. Further documentation is available for both the Legacy V1 API and the new Inform API.
You will need to provision the user on your server. The mobile app could then authenticate to the server and retrieve the needed Validic credentials.
To use an existing Validic User, create a User object and provide it to the startSessionWithUser(User) method.
User user = new User("Your Organization ID",
                     "A Validic ID",
                     "A Validic User Mobile Access Token");

Session.getInstance().startSessionWithUser(user);
User data is persisted between app launches but is deleted if endSession() is called.
Session.getInstance().endSession();Note: As of Validic Android SDK version 1.14.2, it is required to use valid Validic user credentials. The validicUserID, organizationID, and accessToken properties will be sent to the server for validation at the start of any user session. Sessions started with invalid or unknown user credentials (i.e. any credentials not provisioned by the Validic API) will be ended automatically.
Default User
The behavior described in this section is not commonly needed and can be skippedThe recommended SDK implementation is to always provision users on the Validic server then initialize the SDK with valid session credentials for the user. Therefore, use of the default user is not common and its use should be limited to strictly offline instances, where you are unable to retrieve valid session credentials and you need to perform a foreground operation (Bluetooth pair, Bluetooth foreground read, or VitalSnap read).
You must initialize the SDK with a valid user session in order for the following functions to work: Apple Health, Google Fit, and Samsung Health reads and passive Bluetooth reads.
During the transition period to validated users, Validic is providing a "default user" available for those who currently use an invalid user to capture foreground Bluetooth readings without submitting them to the server. This behavior is unsupported and will be deprecated and later removed in a future version of the SDK.
The default user is restricted to foreground Bluetooth reads and VitalSnap reads. All other attempted SDK actions will log a warning but not complete.
Record types
There are seven different subclasses of Record that will be collected by Validic
Biometrics– comprised of a user’s biometric health data such as blood pressure, cholesterol, heart rate, and blood and hormone levels.Diabetes– comprised of a user’s blood glucose and hormone levels related to diabetes treatment and management.Fitness– comprised of a user’s activities that are undertaken with the express purpose of exercising. These activities have a defined duration (time, distance, elevation, etc.)Nutrition– comprised of a user’s activities related to calorie intake and consumption and nutritional information (such as fat, protein, carbohydrates, sodium, etc.)Routine– comprised of a user’s activities that occur regularly throughout the day, without the specific goal of exercise, for example calories burned and consumed, steps taken, stairs climbed. These activities are aggregate throughout the day.Sleep– comprised of a user’s measurements related to the length of time spent in various sleep cycles, as well as number of times woken during the night.Weight– comprised of a user’s weight and body mass.
Record Identifiers
The Validic Mobile SDK uses log_id (for the Inform/V2 API) or activity_id (for the Legacy/V1 API) as the unique identifier for a given record. These IDs are created by the mobile SDK before submission to the server.
The Validic server also assigns an id (for the Inform/V2 API) or _id (for the Legacy/V1 API) for each unique record. It is recommended to use the server-side id / _id to identify and/or de-duplicate records post-submission.
Listening for Record Upload
When Session uploads a record it will notify the stored SessionListener. To receive these notifications, register a SessionListener by calling setSessionListener(SessionListener):
SessionListener listener = new SessionListener() {
    @Override
    public void didSubmitRecord(Record record) {
        // If you want to store a copy locally, now would be the time
    }

    @Override
    public void didFailToSubmitRecord(Record record, Error error) {

        Toast.makeText(getApplicationContext(), "Failed to upload record!", Toast.LENGTH_LONG).show();
    }
};

Session.getInstance().setSessionListener(listener)
If a 400 error is returned from the server, the record will be discarded and SessionListener.didFailToSubmitRecord(Record, Error) will be called. If the record is submitted successfully, didSubmitRecord(Record) will be called.
Secure Storage
EncryptedFileSerializer has been moved to the validicmobile-shared module. To use encrypted storage and leverage the Jetpack Security module for storing data in the Validic SDK, initialize the Validic SDK with an instance of the EncryptedDataFileSerializer and a MasterKey.
Data will be encrypted the first time data is saved to disk.
Bluetooth
Overview
The Validic Mobile SDK supports Bluetooth Low Energy devices via three integration methods, as follows:
| Bluetooth module - custom | Bluetooth module - generic | Lifescan module |
|---|---|---|
| A custom integration via the Bluetooth module is most the common integration method. These devices are assigned unique peripheralIDs and use custom Bluetooth Profiles. | A generic integration via the Bluetooth module is available for most supported device types. These peripheralIDs work for devices that have been identified on the Bluetooth.org site as using the Bluetooth standard Profiles for their device type. | The Lifescan module is a wrapper used alongside LifeScan's Mobile Connectivity Kit. These devices are supported via separate classes than the Bluetooth module devices. |
Readings from custom or generic Bluetooth devices supported in the Bluetooth module can be captured and uploaded to Validic with BluetoothPeripheralController.
Please refer to the LifeScan section for details on how to use the Lifescan module.
Peripherals
A BluetoothPeripheral represents Bluetooth peripheral models that can be discovered or read from by BluetoothPeripheralController.
The class contains various information to be displayed to the user:
getName()– Returns a String representing the customer recognizable name of the peripheral.getImageUrl()– Returns either a local image path (prefixed withassets://) or a remote image path to an example peripheral image.getPairingInstruction()– Returns a String telling the user how to pair the peripheral, if the peripheral requires pairing.getInstruction()– Returns a String telling the user how to initialize the reading process with the peripheral.getReadingInstruction()– Returns a String telling the user what to do during the reading process.
To retrieve a List of supported perpherals simply call:
 <div class="highlight">

     List<BluetoothPeripheral> supportedPeripherals = BluetoothPeripheral.getSupportedPeripherals();

     for(BluetoothPeripheral peripheral : supportedPeripherals) {
         Log.v("Test", "Found peripheral: " + peripheral.getName());
     }

 </div>
Generic Peripherals
You can communicate with glucose meters that fully support the Bluetooth generic Glucose Profile using peripheralID = 1000.
You can communicate with pulse oximeters that fully support the Bluetooth generic Pulse Oximeter Profile using peripheralID = 2000.
You can communicate with pulse oximeters that fully support the Bluetooth generic Blood Pressure Monitor Profile using peripheralID = 3000.
You can communicate with pulse oximeters that fully support the Bluetooth generic Health Thermometers Profile using peripheralID = 4000.
You can communicate with pulse oximeters that fully support the Bluetooth generic Weight Scales Profile using peripheralID = 5000.
Unlike custom-supported peripherals, these generic peripherals have generic object information in the BluetoothPeripheral object. The intended implementation is you either filter these peripherals from your view, if you do not want to display them to your end users, or you substitute in your own device name, image, and instructions within your app so that end users see device information that's applicable to the specific device(s) you wish to support.
Permissions
The validicmobile-ble artifact automatically adds the following permissions to the consuming application's mergedAndroidManifest.xml:
<uses-permission
    android:name="android.permission.BLUETOOTH"
    android:maxSdkVersion="30" />
<uses-permission
    android:name="android.permission.BLUETOOTH_ADMIN"
    android:maxSdkVersion="30" />

<uses-permission android:name="android.permission.BLUETOOTH_CONNECT" />
<uses-permission android:name="android.permission.BLUETOOTH_SCAN" android:permissionFlags="neverForLocation" />
<uses-permission android:name="android.permission.BLUETOOTH_PRIVILEGED" />
<uses-permission android:name="android.permission.ACCESS_BACKGROUND_LOCATION" android:maxSdkVersion="30"/>
Android 10
- Starting with Android 10,
android.permission.ACCESS_FINE_LOCATIONis required by the OS. android.permission.ACCESS_BACKGROUND_LOCATIONmust be requested along withandroid.permission.ACCESS_FINE_LOCATIONin order for Passive Bluetooth reading to succeed if the device is inDOZEmode for devices running api 28 or later
Android 11
- Starting with Android 11, on devices running api >= Android 11 (api 30), the
android.permission.ACCESS_BACKGROUND_LOCATIONmust be granted manually by end user's in the application settings. To navigate to the application settings use the following code
Intent intent = new Intent(
    Settings.ACTION_APPLICATION_DETAILS_SETTINGS,
    Uri.parse("package:" + getApplication().getPackageName())
);
intent.addCategory(Intent.CATEGORY_DEFAULT);
startActivityForResult(intent, BLE_BACKGROUND_CODE);
Android 12
- Starting with Android 12 there are new permissions that must be requested at runtime.
BLUETOOTH_SCAN, andBLUETOOTH_CONNECT. For devices running Android 12 or higher theACCESS_FINE_LOCATIONandACCESS_BACKGROUND_LOCATIONpermissions are no longer required. They are still required for devices running Android 11 or below.
BluetoothPeripheralController
Pair
Check if a BluetoothPeripheral requires pairing by calling:
BluetoothPeripheral peripheral = // ...
peripheral.requiresPairing()
If it does, the user must pair the peripheral before they can take a reading.
BluetoothPeripheral peripheral = // Choose a perpheral from the supported perpherals list
BluetoothPeripheralControllerListener listener = new BluetoothPeripheralControllerListener(){
    @Override
    public void onFail(BluetoothPeripheralController peripheralController, BluetoothPeripheral peripheral, BluetoothDevice bluetoothDevice, ValidicBluetoothException exception) {
        // Tell the user to retry the pairing process
    }

    @Override
    public void onSuccess(BluetoothPeripheralController peripheralController, BluetoothPeripheral peripheral, BluetoothDevice bluetoothDevice, List<Record> records) {
        // The peripheral is now paired
        // Records received during pairing are not submitted
    }

    @Override
    public void onPeripheralDiscovered(final BluetoothPeripheralController peripheralController, BluetoothPeripheral peripheral, BluetoothDevice bluetoothDevice) {
        // The peripheral will connect and start pairing
    }
};

BluetoothPeripheralController controller = new BluetoothPeripheralController();
controller.pairPeripheral(peripheral, listener);

String pairingInstructions = peripheral.getPairingInstruction();
// Display the pairing Instructions to the user
Read
Once you are ready to read from a peripheral, the process is fairly similar to the pairing process.
You’ll want to first show the peripheral’s instructions and eventually show the reading instructions once onPeripheralDiscovered is called.
BluetoothPeripheral peripheral = // The peripheral you want to read from
BluetoothPeripheralControllerListener listener = new BluetoothPeripheralControllerListener(){

    @Override
    public void onPeripheralDiscovered(final BluetoothPeripheralController peripheralController, BluetoothPeripheral peripheral, BluetoothDevice bluetoothDevice) {
        // Display the reading Instructions to the user
    }

    @Override
    public void onFail(final BluetoothPeripheralController peripheralController, BluetoothPeripheral peripheral, BluetoothDevice bluetoothDevice, ValidicBluetoothException exception) {
				BluetoothError error = exception.getError();
        switch (error) {
            case BluetoothError.BluetoothTurnedOff:
                Toast.makeText(getApplicationContext(), "Your bluetooth is off!", Toast.LENGTH_LONG).show();
                break;
            case BluetoothError.NoUser:
                Toast.makeText(getApplicationContext(), "You have not started the session yet!", Toast.LENGTH_LONG).show();
                break;
            case BluetoothError.Cancelled:
                Toast.makeText(getApplicationContext(), "Reading has been cancelled", Toast.LENGTH_LONG).show();
                break;
        }

        Log.e("Error", error.getMessage());
    }

    @Override
    public boolean onSuccess(final BluetoothPeripheralController peripheralController, BluetoothPeripheral peripheral, BluetoothDevice bluetoothDevice, List<Record> records) {

        // If you want to auto-submit records, return true
        return true;

        // else if you want to require the user to confirm the record, return false
        // return false;
    }
};

String instruction = peripheral.getInstruction();
// Display the instruction to the user

BluetoothPeripheralController controller = new BluetoothPeripheralController();
controller.readFromPeripheral(peripheral, listener);
Auto-submission of Records
You have the option to automatically submit records as soon as they are captured, or you can wait for user confirmation before submitting the record. For auto submission, return true inside your onSuccess() method. If you return false you MUST call submitRecord() or the record will be discarded.
Session.getInstance().submitRecord(record);Passive Read
The ValidicMobile library supports reading from bluetooth peripherals without any user interaction once a device has been successfully paired.
The PassiveBluetoothManager manages background reads and interactions with any BluetoothPeripheralController objects in use.
Reading or pairing a peripheral in the foreground will cancel any in progress readings from the background and will restart monitoring in the background once all bluetooth interaction in the foreground has finished.
To set peripherals to be read in the background use the PassiveBluetoothManager.getInstance() singleton as such:
Set<BluetoothPeripheral> peripherals = new HashSet<>();
peripherals.add(BluetoothPeripheral.getPeripheralForID(1);
peripherals.add(BluetoothPeripheral.getPeripheralForID(2);
peripherals.add(BluetoothPeripheral.getPeripheralForID(3);

PassiveBluetoothManager.getInstance().setPassivePeripherals(peripherals);
To stop monitoring peripherals in the background set the background peripherals to an empty set
PassiveBluetoothManager.getInstance().setPassivePeripherals(Collections.emptySet());Listener
Records will be automatically uploaded as they are read.
In order to receive events from the the PassiveBluetoothManager, use one of the following two methods.
In both cases a PassiveBluetoothManager.BluetoothListener must be created in order to receive the events:
PassiveBluetoothManager.BluetoothListener listener = new PassiveBluetoothManager.BluetoothListener(){

    @Override
    public void onSuccess(BluetoothPeripheral peripheral, BluetoothDevice bluetoothDevice, List<Record> records) {
        // Records received in the background are automatically uploaded
    }
    @Override
    public void onFail(BluetoothPeripheral peripheral, BluetoothDevice bluetoothDevice, ValidicBluetoothException exception) {
        // Reading failed in the background
    }
    @Override
    public void onPeripheralDiscovered(BluetoothPeripheral peripheral){
        // A peripheral was discovered and we have setup a connection
    }

    @Override
    public void onBackgroundStart(){
        // Background scanning has begun
    }

    @Override
    public void onBackgroundStop(){
        // Background scanning has stopped
    }
};

Note: The PassiveBluetoothManager uses a WeakReference to manage the passive listener. Activities and Fragments may be destroyed and then recreated when coming from the Background
into the foreground. It is recommended to have a singleton maintain a strong reference to your listener or to set the listener in `Activity.onCreate` or `Fragment.onAttach`
This listener can either be set on the PassiveBluetoothManager instance:
PassiveBluetoothManager.getInstance().setBluetoothListener(listener);Kotlin BLE Requests
Starting with version 1.13.0 The Validic SDK introduces a new Kotlin API for interacting with BluetoothPeripherals and BluetoothDevices. All BluetoothRequests are executed using kotlin coroutines and are exposed as suspend functions.
Scanning
viewLifecycleScope.launch{
   val  request = ScanRequest(bluetoothPeripheral)
    request.setOnStartHandler{Log.i("Bluetooth","Starting scanning")}
    request.setOnCompleteHandler { Log.i("Bluetooth", "Scanning completed"}
    try{
        val scanResult: BluetoothScanResult = request.enqueue()
    }catch(e:ValidicBluetoothException){
        Log.w("Bluetooth", e.getMessage())
    }
}
After retrieving instances of a BluetoothPeripheral and BluetoothDevice from a BluetoothScanResult operations with a BluetoothPeripheral and BluetoothDevice are possible.
Pairing
viewLifecycleScope.launch{
    val  request = ScanRequest(bluetoothPeripheral)
    request.onStart = object: OnStartHandler{ override fun onStart() {Log.i("Bluetooth","Scanning starting")} }
    request.onCompleted = object: OnCompleteHandler{ override fun onComplete { Log.i("Bluetooth", "Scanning completed")} }
    try{
        val scanResult: BluetoothScanResult = request.enqueue()
        val readRequest:ReadRequest = PairRequest(scanResult.bluetoothPeripheral, scanResult.bluetoothDevice)
        readRequest.onStart =  object: OnStartHandler{ override fun onStart() {Log.i("Bluetooth","Pairing starting")} }
        readRequest.onCompleted =  object: OnCompleteHandler{ override fun onComplete { Log.i("Bluetooth", "Pairing completed"} }
        val pairResult = request.enqueue()
    }catch(e:ValidicBluetoothException){
        Log.w("Bluetooth", e.getMessage())
    }
}
Reading
viewLifecycleScope.launch{
    val  request = ScanRequest(bluetoothPeripheral)
    request.onStart = object: OnStartHandler{ override fun onStart() {Log.i("Bluetooth","Scanning starting")} }
    request.onCompleted = object: OnCompleteHandler{ override fun onComplete { Log.i("Bluetooth", "Reading completed")} }
    try{
        val scanResult: BluetoothScanResult = request.enqueue()
        val readRequest:ReadRequest = ReadRequest(scanResult.bluetoothPeripheral, scanResult.bluetoothDevice)
        readRequest.onStart =  object: OnStartHandler{ override fun onStart() {Log.i("Bluetooth","Reading starting")} }
        readRequest.onCompleted =  object: OnCompleteHandler{ override fun onComplete { Log.i("Bluetooth", "Reading completed"} }
        val readResult:ReadResult = request.enqueue()
    }catch(e:ValidicBluetoothException){
        Log.w("Bluetooth", e.getMessage())
    }
}
Monitoring in background
After a PairRequest or a ReadRequest completes successfully, it is possible to set up reading in the background for a specific device.
viewLifecycleScope.launch{
    val  request = ScanRequest(bluetoothPeripheral)
    request.onStart = object: OnStartHandler{ override fun onStart() {Log.i("Bluetooth","Scanning starting")} }
    request.onCompleted = object: OnCompleteHandler{ override fun onComplete { Log.i("Bluetooth", "Reading completed")} }
    try{
        val scanResult: BluetoothScanResult = request.enqueue()
        val readRequest:ReadRequest = ReadRequest(scanResult.bluetoothPeripheral, scanResult.bluetoothDevice)
        readRequest.onStart =  object: OnStartHandler{ override fun onStart() {Log.i("Bluetooth","Reading starting")} }
        readRequest.onCompleted =  object: OnCompleteHandler{ override fun onComplete { Log.i("Bluetooth", "Reading completed"} }
        val readResult:ReadResult = request.enqueue()
        Log.i("Bluetooth", "Reading success")

       val monitorRequest:MonitorDeviceRequest = MonitorDeviceRequest(readResult.bluetoothPeripheral, true);
       val monitorDeviceResult = monitorRequest.enqueue()
       Log.i("Bluetooth", "Enabled monitoring device in the background")
       val disableRequest = MonitorDeviceRequest = MonitorDeviceRequest(readResult.bluetoothPeripheral, false);
     Log.i("Bluetooth", "Disabled monitoring device in the background")
    }catch(e:ValidicBluetoothException){
        Log.w("Bluetooth", e.getMessage())
    }
}
To capture which devices are currently being monitored in the background, query the PassiveBluetoothManager.monitoredDevices property.
val devices:Set<String> = PassiveBluetoothManager.getInstance().getMonitoredDevices()Listening for events can be accomplished setting a BluetoothListener on the PassiveBluetoothManager as described in the above section.
Java Interop
BluetoothRequests can be consumed in java clients by converting the request to a JDK CompletableFuture, ListenableFuture or Single depending on which async library is added to the client dependencies
// app/build.gradle

dependencies{
    implementation "org.jetbrains.kotlinx:kotlinx-coroutines-rx2:1.5.1"
    implementation "org.jetbrains.kotlinx:kotlinx-coroutines-guava:1.5.2"
    implementation "org.jetbrains.kotlinx:kotlinx-coroutines-jdk8:1.5.1"
}
ListenableFuture
        ExecutorService service = Executors.newSingleThreadExecutor();


        try {
        resultFuture.addListener(()->{
    ListenableFuture<BluetoothScanResult> resultFuture = ValidicBluetoothKt.asListenableFuture(new ScanRequest(BluetoothPeripheral.getPeripheralForID(1)));
                            try {
                        BluetoothScanResult result = resultFuture.get();
                        Log.i("Bluetooth", result.getDevice().getAddress());
                    } catch (ExecutionException e) {
                        e.printStackTrace();
                    }
            }, service);

        } catch (ValidicBluetoothException bluetoothException) {
            bluetoothException.printStackTrace();
        }
CompletableFuture
        ExecutorService service = Executors.newSingleThreadExecutor();
        try {
            CompletableFuture<BluetoothScanResult> resultFuture = ValidicBluetoothKt.asCompletableFuture(new ScanRequest(BluetoothPeripheral.getPeripheralForID(1)));
            } catch (InterruptedException e) {
                        e.printStackTrace();
                    resultFuture.handleAsync((result, throwable)->{
                if(throwable!=null){ Log.e(throwable) }
                else {Log.i("Bluetooth", result.getDevice().getAddress()); }
            }, service);

        } catch (ValidicBluetoothException bluetoothException) {
            bluetoothException.printStackTrace();
        }
RxJava Single
   Disposable disposable = null;
   Single<BluetoothScanResult> resultSingle = ValidicBluetoothKt.asRxSingle(new ScanRequest(BluetoothPeripheral.getPeripheralForID(1)));
   disposable = resultSingle.subscribe(result, throwable)->{
          if(throwable!=null){ Log.e(throwable) }
          else {Log.i("Bluetooth", result.getDevice().getAddress()); }
       });
Companion Device Manager
For devices running at least Android 9.0 starting with v1.13.0 it is possible to scan for a BluetoothPeripheral using the OS Companion Device Manager. The Companion Device Manager will scan for BluetoothDevices that match a BluetoothPeripheral and allow the end user to select the desired BluetoothDevice from a System presented dialog. More information on the `Companion Device Manager can be found here and here
val deviceFilter: BluetoothLeDeviceFilter = BluetoothLeDeviceFilter.Builder()
        // Match only Bluetooth devices whose name matches the pattern.
        .setNamePattern(bluetoothPeripheral.regexPattern)
        // Match only Bluetooth devices whose service UUID matches this pattern.
        .addServiceUuid(ParcelUuid(bluetoothPeripheral.getBroadcastingService()))
        .build()

val pairingRequest: AssociationRequest = AssociationRequest.Builder()
        // Find only devices that match this request filter.
        .addDeviceFilter(deviceFilter)
        // Stop scanning as soon as one device matching the filter is found.
        .setSingleDevice(true)
        .build()

val deviceManager =
      requireContext().getSystemService(Context.COMPANION_DEVICE_SERVICE)

deviceManager.associate(pairingRequest,
    object : CompanionDeviceManager.Callback() {
        // Called when a device is found. Launch the IntentSender so the user
        // can select the device they want to pair with.
        override fun onDeviceFound(chooserLauncher: IntentSender) {
            startIntentSenderForResult(chooserLauncher,
                SELECT_DEVICE_REQUEST_CODE, null, 0, 0, 0)
        }

        override fun onFailure(error: CharSequence?) {
            // Handle the failure.
        }
    }, null)
To collect the device that the end user has selected override your activity's onActivityResult. After collected enqueue a PairRequest or ReadRequest with the selected BluetoothDevice and BluetoothPeripheral
override fun onActivityResult(requestCode: Int, resultCode: Int, data: Intent?) {
    when (requestCode) {
        SELECT_DEVICE_REQUEST_CODE -> when(resultCode) {
            Activity.RESULT_OK -> {
                // The user chose to pair the app with a Bluetooth device.
                val scanResult: ScanResult? =
data?.getParcelableExtra(CompanionDeviceManager.EXTRA_DEVICE)
                val device:BluetoothDevice = scanResult?.bluetoothDevice
                viewLifecycleScope.launch{
                    try{
                        val pairResult = PairRequest(bluetoothPeripheral, device).enqueue()
                        Log.i("Bluetooth", "Pair Success with $device.address")
                   }catch(e:ValidicBluetoothExceptiion){
                         Log.e("Bluetooth", e)
                  }
            }
        }
        else -> super.onActivityResult(requestCode, resultCode, data)
    }
}
Considerations
Agamatrix
The Agamatrix Jazz Wireless 2 glucose meter, supported via a custom Bluetooth integration (peripheralID = 32), requires an authentication key, which is provided by Agamatrix, in order to communicate with the meter. To configure your Agamatrix authentication key for use with the Agamatrix meter in the Validic Mobile SDK:
- Create a file named
agamatrix.license - File contents should be your Agamatrix key without the hex prefix notation
0x. For example, if your key is0x011234567890987654321then your file contains011234567890987654321. - Add the
agamatrix.licensefile in the application's/app/src/main/assets/folder.
CVS Health
The CVS Health Advanced Bluetooth Glucose Meter, supported via a custom Bluetooth integration (peripheralID = 33), requires an authentication key, which is provided by Agamatrix, in order to communicate with the meter. To configure your Agamatrix authentication key for use with the CVS Health meter in the Validic Mobile SDK:
- Create a file named
cvs_advanced.license - File contents should be your Agamatrix key without the hex prefix notation
0x. For example, if your key is0x055234567890987654987then your file contains055234567890987654987. - Add the
cvs_advanced.licensefile in the application's/app/src/main/assets/folder.
The CVS Health Digital Glass Body Analysis Scale is supported in an alpha state in the Validic Mobile SDKs. Body weight is the only metric that can be retrieved from the scale and a new user profile will be created on the scale during pairing. Users cannot pair to an existing user profile and historical readings (readings captured prior to pairing) will not be synced.
Roche CoaguChek INR Meter
Approval RequiredThe Roche CoaguChek integration requires pre-approval for Roche's CoaguChek SDK. Please reach out to Validic Support at [email protected] if you are interested in intergrating with Roche CoaguChek INR meters.
The Roche CoaguChek Vantus INR meter Meter (peripheralID = 51) requires a license file which is provided by Validic, in order to communicate with the meter. To configure your Validic License for use with the Roche CoaguChek INR meter in the Validic Mobile SDK:
Android
- Add
validic.licenseprovided via Validic Support in the application's /app/src/main/assets/` folder. - Then in your application before pairing, provide the device encryption key. The key is required to decrypt readings.
- Not every Android phone has the necessary encryption alogorithm, so add a dependency on SpongyCastle for support in your application's
build.gradle-
dependencies{
  implementation: 'com.madgag.spongycastle:prov:1.58.0.0'
}
-
The Roche CoaguChek Vantus INR meter has an uncommon reading workflow which requires that the end user provide their meter's unique encryption key. That encryption key will be used to decrypt the reading values captured from the user's meter. Without a valid encryption key, foreground and passive reads with the INR meter will fail.
Because this workflow is specific to the Roche INR meter, any Validic clients implementing the INR meter Bluetooth integration must build a user experience (modal or screen) to capture the meter's encryption key from the user. This key will then be passed by the client to the Validic SDK where it will be saved and used to decrypt readings. Note: the key is a long string of hexadecimal characters, so it is recommended to implement a QR code reading to capture the code displayed on the meter.
A code sample follows to illustrate what this could look like:
// This example requests the encryption key from inside a function for simplicity.
// This example uses a AppCompatEditText text field to collect the encryption key from the user. It is recommended to use a QR code reader to reduce the likelihood of errors.

private fun pair() {
    viewLifecycleOwner.lifecycleScope.launch {
        try {
            PairRequest(peripheral, device).enqueue()
            if (peripheral.peripheralID == 51) { // Add Encryption Key dialog for Roche CoaguChek
              addButton("Save Encryption Key") {
                val editText = AppCompatEditText(requireActivity())
                editText.isAllCaps = true
                editText.inputType =
                    InputType.TYPE_TEXT_FLAG_CAP_CHARACTERS or InputType.TYPE_TEXT_FLAG_NO_SUGGESTIONS
                dialog =
                    AlertDialog.Builder(requireActivity())
                        .setView(editText)
                        .setTitle("Enter CoaguChek Encryption Key")
                        .setPositiveButton("Ok") { _, _ ->
                          val value = editText.text?.toString()
                          value?.let {
                            if (value.isNotEmpty()) {
                              peripheral.storePeripheralDataForDevice(
                                  device.address,
                                  KEY_ENCRYPTION_KEY,
                                  editText.text?.toString()?.filter { it.isLetterOrDigit() }
                              )
                            }
                            dialog = null
                          }
                        }
                        .setNegativeButton("Cancel") { d, _ ->
                          d?.cancel()
                          dialog = null
                        }
                        .show()
              }
            }

        } catch (e: ValidicBluetoothException) {
          dialog?.dismiss()
        }
    }
}
.
Welch Allyn Series 1500/1700
The Welch Allyn series 1500 blood pressure cuffs sometimes fail to pair on Android 10 phones. Several retries may be needed to receive a successful bond. The behavior is improved on Android 11 and also in the Welch Allyn series 1700 but it's not perfect. The Validic Mobile SDK already attempts to communicate with the bp cuff more than once to help prevent an error, however, you should plan to guide the user through retrying if an error does occur.
Passive Read
- Passive reading is not automatically restarted after device reboot. Your application must be launched or a BootReceiver registered to start passive reading.
- To prevent duplicate records passive reading will not take readings from a peripheral if that peripheral has been read from within the last 15 seconds.
There are several situations where passive bluetooth reading is cancelled and resumed at a later time:
- When the system becomes low on memory, passive reading will be cancelled. When the system frees enough memory it will relaunch passive reading and begin scanning again.
- When the end user turns off bluetooth passive reading will be cancelled and will be automatically restarted once bluetooth is turned back on.
When passive bluetooth reading is cancelled, any current passive readings will be cancelled, and the PassiveBluetoothManager.BluetoothListener will receive onCancelled for each of the peripherals.
Custom global error handler
If using the bluetooth module, a global error handler will be registered via: RxJavaPlugins.setErrorHandler().
If you want to customize this handler, it can set by calling RxJavaPlugins.setErrorHandler(handler) at any point
Please review the RxJava 2.x error handling documentation for more information about this handler.
VitalSnap (OCR)
OCR provides the capability to obtain readings from devices without requiring Bluetooth integration. The recognition process is managed by an instance of ValidicOCRController.
A simple example application, “MiniApps/VitalSnap”, is provided to illustrate the OCR API.
Overview
An instance of the ValidicOCRController class is used to manage the recognition process. An OCRPeripheral represents the peripheral being scanned. The controller is initialized with a peripheral object.
The recognition process involves a fragment that contains the camera preview and an overlay image. The fragment must be injected into your view.
OCR processing begins as soon as the fragment is injected into the view. An instance of ValidicOCRResultListener must be registered to receive intermediate and final results. The camera capture session ends when the fragment is paused.
Peripherals
OCRPeripheral represents peripheral models that can be processed by OCR.
A peripheral object contains various properties which can be displayed to the user:
name- Name of the peripheral comprised of the manufacturer name and model number.imageURL- URL for an image of the peripheral.
ValidicOCRActivity
Validic provides an activity to encapsulate the OCRFragment. It will perform the necessary permission checking for Android versions > 28. To start an instance of the activity start by using an intent and Activity.startForResult();
public void startOCRActivity() {
    Intent intent = new Intent(this, ValidicOCRActivity.class);
    OCRPeripheral peripheral = OCRPeripheral.getPeripheralForId(1); // One Touch
        intent.putExtra(ValidicOCRActivity.PERIPHERAL_ID, peripheral.getPeripheralID());
}
Optionally a File path can added to the request if needed:
File f = new File(getFilesDir(), "image.png");
intent.putExtra(ValidicOCRActivity.IMAGE_PATH f.getAbsolutePath());
Then start the activity for a result
activity.startActivityForResult(intent, ValidicOCRActivity.ACTION_READ_OCR);To receive a converged result in the same activity you launched the ValidicOCRActivity override OnActivityResult()
protected override void OnActivityResult(int requestCode, int resultCode, Intent data) {
    if (requestCode == ValidicOCRActivity.ACTION_READ_OCR) {
        if (resultCode. == Activity.RESULT_OK) {
            OCRPeripheral peripheral = (OCRPeripheral) data.getSerializableExtra(ValidicActivity.Peripheral_KEY);
            Record record = (Record) data.getSerializableExtra(ValidicActivity.RECORD_KEY);
            String s = data.getStringExtra(ValidicActivity.IMAGE_KEY);
            File f = new File(s);
            Uri uri = Uri.fromFile(f);
            if (uri != null) {
                bitmap = BitmapFactory.decodeStream(contentResolver.openInputStream(uri));
                // Bitmap is now in memory
            }
        } else if (resultCode == ValidicOCRActivity.ERROR_WRITING_FILE) {
            OCRPeripheral peripheral = (OCRPeripheral) data.getSerializableExtra(ValidicActivity.Peripheral_KEY);
            Record record = (Record) data.getSerializableExtra(ValidicActivity.RECORD_KEY);
        } else {
            // Error with activity
        }
    }

}
ValidicOCRController
The ValidicOCRController requires an OCRPeripheral for its initializers.
To obtain an OCRPeripheral, you may choose from a list of all available devices:
List<OCRPeripheral> allSupportedPeripherals = OCRPeripheral.getSupportedPeripherals();or if you know the specific peripheral type that you want:
final static int ONETOUCH_ULTRAMINI = 1;
OCRPeripheral onetouchPeripheral = OCRPeripheral.getPeripheralForOCRPeripheralType(ONETOUCH_ULTRAMINI);
Once a peripheral is obtained, construct the ValidicOCRController and assign it an instance of ValidicOCRResultListener:
ValidicOCRController ocrController = ValidicOCRController.initWithOCRPeripheral(peripheral);
ocrController.setListener(listener);
Runtime unit selection
For any glucose meter in our lineup of supported meters, you can now specify mmol/l or mg/dL at runtime for a given reading. If no unit is provided, mg/dL is assumed.
For the Zewa 11110 thermometer, you can specify Celsius or Fahrenheit at runtime for a given reading. If no unit is provided, Fahrenheit is assumed.
An example using the ValidicOCRActivity:
OCRPeripheral peripheral = OCRPeripheral.getPeripheralForId(1); // One Touch

Intent intent = new Intent(this, ValidicOCRActivity.class);
intent.putExtra(ValidicOCRActivity.PERIPHERAL_ID, peripheral.getPeripheralID());
intent.putExtra(ValidicOCRActivity.GLUCOSE_UNIT_KEY, Unit.Glucose.MMOLL);
An example using the ValidicOCRController:
ValidicOCRController ocrController = ValidicOCRController.initWithOCRPeripheral(peripheral, Unit.Glucose.MMOLL);ValidicOCRFragment
The camera preview and overlay are contained in a fragment that must be injected with an instance of ValidicOCRController. Ensure your view contains a FrameLayout, preferably fullscreen in size, and give it a referencable id such as activity_ocr_fragment_container.
Injection Example:
ocrController.injectOCRFragment(getFragmentManager().beginTransaction(),
                R.id.activity_ocr_fragment_container)
                .commit();
This will immediatly begin the OCR process.
View Structure
The preview and overlay are handled by the library, but showing intermediate results are not. You must provide a fullscreen container for the fragment in order for the OCR functionality to be reliable. The relevant part of the overlay is guaranteed to be no larger than half the height of the screen. Should you choose to show any other views during the OCR process, please restrict them to the lower half of the screen.
Listener
During OCR processing, methods on an instance of ValidicOCRResultListener will be invoked.
public void didProcessResult(VitalSnapResult vitalSnapResult) is invoked for each camera frame captured and provides intermediate results. The VitalSnapResult object contains the current recognized string. The result string can be displayed to the user as an indication of what portion of the display is not being recognized. Depending on the peripheral, the result string may contain linefeeds representing multiple lines being recognized. The result string also indicates whether glare is affecting OCR of a particular digit by returning the * char, and therefore can be helpful feedback for the user to avoid negative effects of glare on the reading.
Log.v(TAG, "Partial result: " + vitalSnapResult.toString());public void didCompleteReading(Record record, Bitmap bitmap, ValidicOCRPeripheral validicOCRPeripheral) is invoked when OCR processing has completed with sufficient confidence.
if (validicOCRPeripheral.getType() == Peripheral.PeripheralType.GlucoseMeter) {
    Diabetes diabetesRecord = (Diabetes) record;
    Log.v(TAG, "Blood glucose captured: " + diabetesRecord.getBloodGlucose().toString());
}
The value received from the listener should be verified by the user and then submitted to the Validic server:
// After verification, queue the record and the image to be uploaded to the server
Session.getInstance().submitRecord(record, bitmap);
The listener is passed a Record subclass appropriate for the peripheral and the matching cropped preview image with embedded additional metadata. The recognized values returned in the record should be visually validated by the user. The cropped preview image can be displayed to the user to validate the recognized values before uploading to the server.
OCR Lifecycle
OCR processing commences when the ocr fragment is injected into your view.
Processing is stopped when the fragment is paused or a final value has been converged. If no value has been converged on, the fragment will resume processing onResume. To restart or to take additional readings with the same peripheral, simply call restartOCR on the ValidicOCRController.
ocrController.restartOCR();Google Fit
Google Fit SDKs are being sunset by GoogleAs of May 1, 2024 Google has decided to stop accepting new applications for the Google Fit Android SDKs that are used in the Validic Mobile Google Fit integration.
The Fit Android SDKs are deprecated and will be sunset in 2026. At that time, the Google Fit SDKs will no longer be available for use. Note: This sunset date has been adjusted from Google's original sunset date, which was June 30, 2025.
Given the ambiguous nature of the new sunset date (early 2026, late 2026, Jan. 1, 2026....we're not sure and they're not saying), the Validic team highly encourages all existing clients using the Google Fit SDK integration to switch to Health Connect as quickly as possible.
During this time, clients who have already been approved by Google to use the Google Fit Android SDKs may continue to use the Google Fit integration. However, you continue to use the Google Fit SDK integration at your own risk.
You can find the latest information from Google at any time by visiting their help pages.
Validic offers an SDK integration to Android Health Connect in the Inform SDK, which can be used to retrieve Google Fit data.
To learn more, please see Migrating Users from Google Fit SDK to Health Connect.
This project integrates Google Fit with the Validic Mobile Aggregator to passively collect data on behalf of an end user. Validic ensures that our Mobile SDK makes use of the minimal scopes needed for our supported data types.
As of Google Fit version com.google.android.gms:play-services-fitness:20+, all read scopes are restricted and will require completing Google’s sensitive scope verification or restricted scope verification and security assessment to retrieve data. Please see Google's announcement for further details: https://developers.google.com/fit/improvements
Initialization
The ValidicFitManager will be initialized at app startup and will immediately start listening for previously subscribed data types. It is recommended that you set a listener on the ValidicFitManager during your applicatin onCreate() method
    private final ValidicFitManager.AggregatorListener fitListener = new AggregatorManager.AggregatorListener() {
        @Override
        public void onRecords(@NotNull Map<Record.RecordType, Integer> summary) {
            // summary of number of records collected and queued for submission to the Validic Inform API
        }

        @Override
        public void onException(@NotNull AggregatorException exception) {
            // An exception has occurred. Check if the exception can be handled by the sdk
            if (exception.getHasResolution()) {
                // handle the resolution using an activity
                exception.handleResolution(activity, 999);
            }
            //otherwise display error
        }
    };
Request permissions
Before collecting any data from Google Fit, a Google Account must be associated with the ValidicFitManager, and the end user must authorize the app to collect data on their behalf.
Get previously granted permissions
To check if permissions have already been granted the hasDataAccess(Set<DataType> dataTypes) method can be used
    Set<DataType> dataTypes = new HashSet<>();
    dataTypes.add(DataType.TYPE_STEP_COUNT_DELTA);
    Map<DataType, Boolean> = ValidicFitManager.INSTANCE.hasDataAccess(dataTypes);
The map returned from hasDataAccess(Set<DataType> dataTypes) associates a DataType with true, if a valid Google account exists and permission has previsouly been granted, or false otherwise.
Request new permissions
~~To request permission from the end user to authorize data collection, first add result handling to your activity
@Override
    protected void onActivityResult(int requestCode, int resultCode, @Nullable Intent data) {
        super.onActivityResult(requestCode, resultCode, data);
        ValidicFitManager.INSTANCE.handlePermissionResult(this, requestCode, resultCode, data);
}- Above deprecated in v1.12.14
Next, the requestPermissions(Activity, Set<DataType>, Integer, Integer, PermissionHandler) method can be used to authorize your application
// MyActivity
    Set<DataType> dataTypes = new HashSet<>();
    dataTypes.add(DataType.STEP_COUNT_DELTA);
    ValidicFitManager.INSTANCE.requestPermissions(MyActivity.this, dataTypes, new AggregatorManager.PermissionsHandler<DataType>() {
                        @Override
                        public void onResults(Map<DataType, Boolean> dataTypes) {
                          // do work with results.
                        }
                    });
Android 10
For the Android client Apps that target API 28 the permission below is required in the AndroidManifest.xml. The Validic SDK will add this permission to its manifest so that it will be merged with the client when they add our library to their application.
<uses-permission android:name="android.permission.ACTIVITY_RECOGNITION"/>
This permission is required to subscribe to the following data types:
- com.google.step_count.delta
- com.google.step_count.cumulative
- com.google.step_count.cadence
- com.google.activity.segment
- com.google.activity.exercise
For apps targeting Android 10, this permission must be requested from the user at runtime
    if (ContextCompat.checkSelfPermission(thisActivity, Manifest.permission.ACTIVITY_RECOGNITION)
              != PackageManager.PERMISSION_GRANTED) {
          // Permission is not granted
    }

    ActivityCompat.requestPermissions(thisActivity,
                      arrayOf(Manifest.permission.ACTIVITY_RECOGNITION),
                      MY_PERMISSIONS_REQUEST_ACTIVITY_RECOGNITION);
Manage subscriptions
After Permissions have been granted for a DataType the ValidicFitManager can be used to add subscriptions to data change events from Google Fit. Data will automatically will queued for submission to the Validic API when internet is available on the device
    Set<DataType> dataTypes = new HashSet<>();
    dataTypes.add(DataType.TYPE_STEP_COUNT_DELTA);
    ValidicFitManager.INSTANCE.subscribe(dataTypes);
To unregister from receiving data update events use the ValidicFitManager to unsubscribe
ValidicFitManager.INSTANCE.unsubscribe(DataType.TYPE_STEP_COUNT_DELTA)Get a list of currently subscribed DataTypes
List<DataType> subscriptions = ValidicFitManager.INSTANCE.currentSubscriptions()Currently Supported DataTypes
- DataType.TYPE_STEP_COUNT_DELTA
- DataType.TYPE_WEIGHT
- DataType.TYPE_HEART_RATE_BPM
- DataType.TYPE_CALORIES_EXPENDED
- DataType.TYPE_MOVE_MINUTES
- DataType.TYPE_DISTANCE_DELTA
- DataType.TYPE_NUTRITION
Records collected are automatically submitted to the Validic Inform API and a summary of records processed will be sent to any AggregatorListener#onRecords(summary) registered using ValidicFitManager.INSTANCE.setListener(fitListener) For an example of setting a listener see Initialization
Fetch historical data
Validic provides the ability to query up to six months of data for a subset of data types provided by Google Fit using ValidicFitManager.fetchHistory(HistoryType, LocalDate, LocalDate)
One historical set is available:
- HistoryType.Summary - SUMMARIES (step and similar daily summary) data
Once Records have been received and event will be sent to the listener registered with the ValidicFitManager . Records will automatically be queued for submission to the Validic API
ValidicFitManager.listener = object: AggregatorManager.Listener {

    override fun onRecords(summary:Map<RecordType, Int){
        // show success
    }
}

ValidicFitManager.fetchHistory(HistoryType.Summary, LocalDate.now.minusDays(30), LocalDate.now())
Logout
To remove all subscriptions and log an end user out simply call
ValidicFitManager.INSTANCE.disconnect()Listening to Google Fit API Exceptions
ValidicFitManager.setListener(new AggregatorManager.Listener{

@Override
public void onError(AggregatorException e){
if (e instanceOf FitAggregatorException){
    FitAggregatorException ex = (FitAggregatorException) e;
    Status s = ex.getStatus();
   if(s.statusCode == FitExceptionCodes.API_EXCEPTION){

   }
}
Specific status codes are provide for use by the GoogleApi base class as listener results.
More information can be found here and here.
Samsung Health
The Validic Mobile library provides a simple way to read and upload data from Samsung Health to Validic. Through the SHealthManager you can subscribe to specific Samsung Health data types and automatically upload them to Validic in the background as new data is recorded.
General setup
Approval RequiredThe Samsung Health integration requires pre-approval for Samsung's Device SDK.
Currently, Samsung is going through an update to better support their partners and, for that reason, they are not accepting applications for the Partner Apps Program.
If you would like to retrieve Samsung Health data, please consider Health Connect. Health Connect serves as a health data aggregator on Android phones -- like Apple Health does for iPhones -- and you will be able to receive Samsung Health data, Google Fit data, and more through our integration to Health Connect.
See Migrating Users from Samsung Health SDK to Health Connect for more information.
You can download the aar from the Samsung Health website: https://developer.samsung.com/health/android/overview.html#SDK-Download
In order to test, you must enable developer mode in the Samsung Health app on your phone. For instructions on how to enable developer mode please see Samsung's website: https://developer.samsung.com/health/android/data/guide/dev-mode.html
Note: Starting with Samsung Health app version 6.11.0.061 (released August 2020), in order to gain access to Samsung Health data, with or without developer mode enabled, you must first be approved by Samsung and receive a Samsung dev access key. Prior versions of the Samsung Health app do not require the dev access key when the Samsung Health app is in developer mode.
You can learn more about requesting access via Samsung's website here: https://developer.samsung.com/health/android/overview.html#Partner-Apps-Program
Before you can use the Samsung Health features of the library, be sure to import the Samsung Digital Health Healthdata aar into your project by adding the following line to your gradle dependencies:
implementation files('libs/samsung-health-data-1.5.0.aar')Manage subscriptions
Samsung provides several data types that can be subscribed to for notification when data changes.
The available data types are:
- com.samsung.health.blood_glucose
- com.samsung.health.blood_pressure
- com.samsung.health.body_temperature
- com.samsung.health.caffeine_intake
- com.samsung.health.exercise
- com.samsung.health.hba1c
- com.samsung.health.heart_rate
- com.samsung.health.oxygen_saturation
- com.samsung.health.sleep
- com.samsung.health.sleep_stage
- com.samsung.health.uv_exposure
- com.samsung.health.water_intake
- com.samsung.health.weight
- com.samsung.shealth.step_daily_trend
- com.samsung.shealth.nutrition
Unsupported types (see https://developer.samsung.com/health/android/release-note.html for more information): com.samsung.health.food_info com.samsung.health.food_intake
NOTE: Data types that are going to be used in your application must be added to the AndroidManifest.xml.
<application>
    // Rest of app

    <meta-data android:name="com.samsung.android.health.platform_type" android:value="rel" />
    <meta-data
        android:name="com.samsung.android.health.permission.read"
        android:value=" com.samsung.health.blood_glucose;
                        com.samsung.health.blood_pressure;
                        com.samsung.health.body_temperature;
                        com.samsung.health.caffeine_intake;
                        com.samsung.health.exercise;
                        com.samsung.health.hba1c;
                        com.samsung.health.heart_rate;
                        com.samsung.health.oxygen_saturation;
                        com.samsung.health.sleep;
                        com.samsung.health.sleep_stage;
                        com.samsung.health.uv_exposure;
                        com.samsung.health.water_intake;
                        com.samsung.health.weight;
                        com.samsung.shealth.step_daily_trend;
                        com.samsung.shealth.nutrition" />
Subscription sets
Data types are grouped into logical sets; SHealthSubscription.SubscriptionSet is an Enum that groups several data types together to register for related data types. The available subscription sets are:
- Routine - Daily step data
- com.samsung.shealth.step_daily_trend
- Diabetes - Blood glucose and hba1c data
- com.samsung.health.blood_glucose
- com.samsung.health.hba1c
- Weight - Weight and height data
- com.samsung.health.weight
- Fitness - Exercise data
- com.samsung.health.exercise
- Sleep - Sleep and sleep stage data
- com.samsung.health.sleep
- com.samsung.health.sleep_stage
- Nutrition - Food and nutrition data
- com.samsung.health.nutrition
- com.samsung.health.caffeine_intake
- com.samsung.health.water_intake
- Blood Pressure - Blood pressure data
- com.samsung.health.blood_pressure
The group of data types for each subscription set can be found using:
SHealthSubscription.permissionStringsForSubscriptionSet(SHealthSubscription.SHealthSubscriptionSet.FITNESS);Request permissions
Before a subscription can be created the related permissions must be granted.
Requesting permissions will immediately display a Samsung Health dialog through which the user may grant or deny requested permissions.
The result of the user’s selections will be delivered through an SHealthManager.SHealthListener callback; specifically the onPermissionChange method will be called.
Please read SHealth Listener for more information regarding registering and implementing this callback.
Request permissions:
SHealthManager.getInstance().requestPermissions("com.samsung.health.blood_glucose", "com.samsung.health.blood_pressure");Subscribe to permissions
Be sure to request permissions as described above before subscribing.
Subscribing to Samsung Health updates only needs to be done once for a user. The subscriptions will be persisted across app launches in the Session object.
Data types can be subscribed to individually:
SHealthManager.getInstance().requestSubscriptions("com.samsung.health.blood_glucose", "com.samsung.health.blood_pressure");or as part of a subscription set:
SHealthManager.getInstance().requestSubscriptions(SHealthSubscription.permissionStringsForSubscriptionSet(SHealthSubscription.SHealthSubscriptionSet.FITNESS));To start the Samsung Health service in the foreground. For Android versions >= 28 a notification must be supplied to allow the background scanning to continue to run while the app is not in the foreground.
Please note that on Android version >= 28 a notification channel must be created If the application is targeting at least android-28, the FOREGROUND_SERVICE permission must be added to the application’s manifest as well
<manifest>
    <uses-permission android:name="android.permission.FOREGROUND_SERVICE"/>
</manifest>
Please review documentation regarding Doze for more information.
Individual subscription:
 // Create Notification Channel
NotificationChannel channel = ...


 // Create a notification\
Notification notification = ...\
NotificationParams params = new NotificationParams(1, notification);

SHealthManager.getInstance().requestSubscriptions(param, "com.samsung.health.blood\_glucose", "com.samsung.health.blood\_pressure");
As a subscriptions set:
     // Create Notification Channel
        NotificationChannel channel = ...
    SHealthManager.getInstance()
        .requestSubscriptions(params, SHealthSubscription.permissionStringsForSubscriptionSet(SHealthSubscription.SHealthSubscriptionSet.FITNESS)
        );
To stop monitoring peripherals via the Notification when using a foreground service a PendingIntent should be used to notify a BroadcastReceiver to take the appropriate action:
Register the BroadcastReceiver in the Manifest:
<receiver android:name="com.validic.mobile.shealth.SHealthServiceStopReceiver">
    <intent-filter>
        <action android:name="com.validic.mobile.shealth.STOP_SHEALTH_SERVICE" />
    </intent-filter>
</receiver>
Add a PendingIntent to be used when the notification is interacted with:
Intent intent = new Intent(SHealthServiceStopReceiver.ACTION_STOP_SHEALTH_SERVICE);
PendingIntent pendingIntent = PendingIntent.getBroadcast(context, 200, intent, 0);

// Create a notification that uses the pending intent
Notification notification = new NotificationCompat.Builder(context)
                                .addAction(icon, message, pendingIntent)
                                // Continue setting up notification
                                .build();
Fetch historical data
Validic provides the ability to query six months of data for a subset of data types provided by Samsung Health by querying a group of SHealthSubscription.SHealthHistoricalSet
Two historical sets are available:
- SHealthSubscription.SHealthHistoricalSet.FITNESS - Workouts data
- SHealthSubscription.SHealthHistoricalSet.ROUTINE - Summaries (step) data
To execute a historical fetch use the SHealthManager.getInstance() to perform the historical fetch operation
SHealthManager.getInstance().fetchHistoricalSets(SHealthSubscription.SHealthHistoricalSet.FITNESS);SHealth Listener
To listen for events from SHealth, a SHealthListener can be set to receive events from SHealth.
SHealthManager.getInstance().setSHealthListener(new SHealthListener() {

   @Override
    public void onError(final SHealthError error) {
        // An error specific to SHealth has occured. Check the error type for additional actions.
    }

    @Override
    public void onPermissionChange(String[] acceptedPermissions, String[] deniedPermissions) {
        // Permissions were requested as part of the workflow.
    }

    @Override
    public void onRecords(Map<Record.RecordType, Integer> summary) {
        // Records were gathered by an SHealth data change.
    }

    @Override
    public void onHistoricalFetch(Map<RecordType, Integer> summary) {
        // Records were fetched from SHealth history.
    }
}
Note: The SHealthManager uses a WeakReference to manage the passive listener. Activities and Fragments may be destroyed and then recreated when coming from the Background into the foreground. It is recommended to have a singleton maintain a strong reference to your listener or to set the listener each time in Activity.onCreate or Fragment.onAttach
Example
A typical use of the Samsung Health component would be to create a Switch that adds the required subscriptions when toggled on and removes them when toggled off. Example:
new CompoundButton.OnCheckedChangeListener() {
    @Override
    public void onCheckedChanged(CompoundButton compoundButton, boolean isChecked) {
        if (isChecked) {

            SHealthManager.getInstance().addSubscriptions(
                    SHealthSubscription.permissionStringsForSubscriptionSet(SHealthSubscription.SHealthSubscriptionSet.FITNESS));

        } else {
            SHealthManager.getInstance().removeAllSubscriptions();
        }
    }
};
Notes
In order to resume listening for subscriptions upon app launch you must call observeCurrentSubscriptions() inside your application’s onCreate function:
public class YourApplication extends Application {

    @Override
    public void onCreate() {
        super.onCreate();

        ValidicMobile.getInstance().initialize(context);
        SHealthManager.getInstance().observeCurrentSubscriptions();
    }

}
Calling Session.getInstance().endSession() will remove all S Health subscriptions and stop listening for new data.
LifeScan
Approval RequiredThe LifeScan integration requires pre-approval for LifeScan's OneTouch Mobile Connectivity Kit (MCK). Please reach out to Validic Support at [email protected] if you are interested in LifeScan.
Overview
Validic OneTouch module provides a convenience method to the Validic SDK for converting a BloodGlucoseRecord from the LifeScan MCK to a Diabetes object. This module must be used with the LifeScan OneTouch Mobile Connectivity Kit (MCK). Please reference the readme and documentation in the MCK for details on how to setup and implement it.
Installation
Add OneTouchMobileConnectivityKit.aar, validicmobile_lifescan.aar, and validicmobile-shared.aar, to the libs/ folder of your project.
Licensing
To properly install the license, please start by: 1) Making sure your file is named onetouch-license.json 1) Moving the file into your project so that its location looks like the following: app/src/main/assets/onetouch-license.json 1) Making sure your application’s app id matches the key Android App Identifiers in the license file.
Note: Modifying the content of the AAR or license file in anyway will invalidate the license.
Dependencies
Add these dependency references to your build.gradle.
    //Validic dependencies
    implementation files('libs/validicmobile-shared.aar')
    implementation files('libs/validicmobile_lifescan.aar')

    implementation 'com.jakewharton.threetenabp:threetenabp:1.2.0'
    implementation 'com.google.code.gson:gson:2.8.5'
		implementation 'com.squareup.retrofit2:retrofit:2.10.0'
    implementation 'com.squareup.retrofit2:converter-gson:2.10.0'
    implementation 'org.jetbrains.kotlin:kotlin-stdlib-jdk7:1.5.0'

    //LifeScan dependencies
    implementation files('libs/OneTouchMobileConnectivityKit.aar')
    implementation 'com.androidx.core:1.2.0'
    implementation 'com.jakewharton.timber:timber:4.7.0'
    implementation "com.fasterxml.jackson.core:jackson-databind:2.9.8"
    implementation 'com.getkeepsafe.relinker:relinker:1.4.4'
Background Connection Listener
To Connect to Lifescan Glucose Meters in the background (while using another app, or the screen is off) start the Validic Lifescan Service to connect and report information about previously paired One Touch Glucose meters that have been found in the background. To start add a BackgroundConnectionListener to the ValidicLifescan singleton.
        ValidicLifeScan.getInstance(getActivity()).addBackgroundConnectionListener((device, info) -> device.operations().getBloodGlucoseRecords(getActivity(), PreferenceManager.getDefaultSharedPreferences(getActivity()).getInt(device.getIdentifier(), 0), null, new CompletionListener<BloodGlucoseRecordResponse>() {
            @Override
            public void onSuccess(@NonNull OneTouchDevice oneTouchDevice, @Nullable BloodGlucoseRecordResponse bloodGlucoseRecordResponse) {
                // store last anchor
                PreferenceManager.getDefaultSharedPreferences(getActivity()).edit().putInt(oneTouchDevice.getIdentifier(), 0).apply();
                List<Record> records = new ArrayList<>(ValidicLifeScanKt.asDiabetesRecords(bloodGlucoseRecordResponse, oneTouchDevice));
                Session.getInstance().submitRecords(records);
            }
        }));


    ValidicLifeScan.getInstance(context).startBackgroundRead(params);
If there are no paired One Touch Devices then starting background read will No-Op.
The NotificationParams are used to display a notification to end users while the connections are pending in the background. Notifications can be configured to contain an action to pause reading device information in the background until the next app time startBackgroundRead is called again.
Here is an example of building a Notification that has a PendingIntent action that will stop the background read service:
    private void startBackgroundReadService(Context context) {
        String notificationId = UUID.randomUUID().toString();
        if (Build.VERSION.SDK_INT >= Build.VERSION_CODES.O) {
            NotificationManager notificationManager = (NotificationManager) context.getSystemService(Context.NOTIFICATION_SERVICE);
            NotificationChannel channel = new NotificationChannel(notificationId, "LifeScan Background " +
                    "Notification", NotificationManager.IMPORTANCE_DEFAULT);
            notificationManager.createNotificationChannel(channel);
        }
        Notification notification = getBackgroundReadNotification(context, notificationId);
        ValidicLifeScan.getInstance(context).startBackgroundRead(new NotificationParams(123123, notification));
    }

    private Notification getBackgroundReadNotification(Context context, String notificationChannelId) {
        Intent serviceIntent = new Intent(context, LifescanBackgroundReadService.class);
        serviceIntent.putExtra(LifescanBackgroundReadService.INTENT_KEY_STOP, true);
        PendingIntent stopServicePendingIntent = PendingIntent.getService(context, 0, serviceIntent, 0);

        return new NotificationCompat.Builder(context, notificationChannelId)
                .addAction(R.drawable.stop_action_icon_visible_pre_nougat, "Stop Service", stopServicePendingIntent)
                .setContentTitle("Custom Content Title")
                .setContentText("Helpful notification content.")
                .setColor(ContextCompat.getColor(context, R.color.your_accent_color_perhaps))
                .setSmallIcon(R.drawable.ic_icon_notification)
                .build();
    }
To stop background reading call:
ValidicLifeScan.getInstance(context).stopBackgroundRead();Considerations
- The Validic native library module for OneTouch requires a license file from LifeScan, that must be provided for their SDK, and also the Validic OneTouch module to function.
- Attempting to take a reading from an unpaired device can start the pairing flow. This is a feature of the OneTouch MCK and cannot be overridden.
Lifecycle of the Background Read Service
The Validic Lifescan Background Read Service enables background connections to paired OneTouch Glucose meters by running as a foreground service. When started, it checks for paired devices and Bluetooth support, and will stop itself if either is unavailable. The service requires a foreground notification; if none is provided, a default notification will be shown. The service can be stopped at any time via the API, and will also stop itself on timeout.
Methods
ValidicLifeScan.getInstance(context).startBackgroundRead(params): Starts the background read service.ValidicLifeScan.getInstance(context).stopBackgroundRead(): Stops the background read service.ValidicLifescan.getInstance(context).backgroundServiceRunning:Query if the background read service is currently running
Notifications
The service runs in the foreground and requires a notification. You can customize the notification and provide actions (e.g., to stop the service) using a PendingIntent.
Edge Cases
- If no devices are paired or Bluetooth is unsupported, the service will no-op and stop itself.
- Attempting to take a reading from an unpaired device may trigger the pairing flow (as per OneTouch MCK behavior).
Foreground Service Behavior on Android 15+
On Android 15 (API level 34) and above, the Lifescan Background Read Service uses different foreground service types depending on permissions:
- If the app has been granted the
BLUETOOTH_CONNECTpermission, the service uses theFOREGROUND_SERVICE_TYPE_CONNECTED_DEVICEtype. This is optimal for device connectivity and ensures the service is treated appropriately by the system. - If the permission is not granted, the service falls back to
FOREGROUND_SERVICE_TYPE_DATA_SYNC, which is suitable for background data operations but may have different system restrictions and behaviors.
This distinction helps ensure the service operates reliably and complies with Android's background execution policies. The notification shown to the user will reflect the service's current state and type.
Service Timeout
Foreground services on Android 15+ are subject to stricter timeout policies. Foreground services have a maximum of 6 hours that they can run continuously. After this period, the system may stop the service if it is not actively performing a task that justifies its foreground status.
Updated about 2 months ago